There is little doubt that some photographs are simply over processed. All of the various tools that are available make it possible to achieve some amazing images. In some cases a photographer has no choice but to spend a lot more time developing and working on an image. It has made the news on a number of occasions that photographs that appear on the front of magazines are often edited extensively so that facial features are smoothed and every potential defect is removed. Somewhere in the photograph is the original person, often identified by a certain look in their eyes and by the general shape and general colouring, but they are significantly different from the person that you would meet if you were to see them in the street. So digital photography has allowed for a certain style of look to be achieved at the expense of what might be termed naturalness.
Is there anything wrong with using these tools? Some people would argue from each opposing position. The fact is that editors for magazines require a specific image. The photography can achieve this by some judicious editing. A nice looking house may be just what is required for a certain feature page but the editor wants the house to appear near a mountain so the house is cropped from its original setting and carefully placed within a background that is appropriate to the article. The image makes a point that supports the article and all is well.
For photographers looking for a more natural and realistic approach the temptation might exist to adopt some of these techniques. Colours may become unrealistic with blue skies taking on a tone that is much deeper than naturally occurs. Skin tones may have their red tones reduced considerably. We often see this with coastal settings where the foreground seems a bit dull and drab so the photographer uses tools within photo shop to significantly enhance the colours. Thus the foreground works well with the image. A number of people that I've spoken to do become somewhat concerned about this.
For example a major photography purchaser had purchased a number of images from a well-known Australian photographer. He had been assured that the images that he was purchasing conveyed natural colouring at certain times of day on our West Australian coast. Having spent on a number of images for corporate settings he confided in me his sadness when he discovered that the overall colouring of the evening sky was part of a stock standard editing program designed to give that tone as well as a feature of the printers the photographer was using. He had spent some time on the coast himself and realised that photographs that he had previously dismissed, despite the fact that they were beautifully composed, were in fact much more natural. He had just thought that the photographer had a flair for being on the coast at the right time whereas in reality all of the photographs that had been purchased had been over manipulated. To him this was really important.
Now don't at all think that I am suggesting that there is anything wrong with enhancing colours and tones in photographs. It's doubtful that we will ever see images where some enhancement doesn't occur. And I'm sure that many purchasers of photographs by the aforementioned photographer are very happy with them. Personally I think that they are great. It was simply the case that this individual purchaser felt very strongly that he wanted something that conveyed natural tones and colours. And interestingly I have spoken to a number of people who have made the same request.
On the wall in my office I have a number of photographs. I took them on brightly lit days and tried to capture the gorgeous light that we have in the morning and evening in Western Australia. Not always an easy task. But I'm confident that the colouring in the images captures the reflected sunlight at that time of day accurately. The first thing that some will say when they see some of these images however is "is that the real colour?" And the number of times that I've heard this suggests that this is the sort of thinking that is now becoming popular in the community in general. People are looking for realism with realistic colours.
What about all the tools? Well I'll give you an example of a situation where I cannot see any harm of using cloning tool or some such tool to fix the photograph. I was taking a photograph out in the country in the early morning and noticed a lovely track leading alongside a field which had a light mist in the background. There were sheep grazing in the field. A perfect opportunity for a photograph. So I took some time and took the photograph. On getting the image up on the computer screen I was very pleased that then noticed to my dismay to piece of rubbish partially obscured in the grass in the bottom right-hand corner of the photograph. It was a discarded can of soft drink that I had not seen looking through the viewfinder so I used the cloning tool and removed it.

Wednesday 18 December 2013
Monday 2 September 2013
Leica Vario-Elmar-S 30–90 mm f/3.5–5.6 ASPH User Comments
In this post we take a look at the Leica 30-90 used with the S2P. This was exciting to even consider: finally a zoom for the medium format system. Would it live up to the hype? According to the reports on Leica - this is about as perfect a combination as a photographer could use. As with all my favorite lenses from Leica - they tend to be quite heavy. This is a large lens. But we wanted to try it out on a trip to see how it handled. We took the camera combination to Yorkshire, Derbyshire and Lincolnshire in mid 2013. Here is a report with examples.
Typical Advertising Comments
The Leica Vario-Elmar-S 30–90 mm f/3.5–5.6 ASPH. combines the versatility of a zoom lens with the imaging performance of equivalent primes. From the angles of view it translates to a 24 to 72 mm zoom in 35 mm format – the versatility offered by this universal range of focal lengths, from an extreme wide-angle to a little longer than a standard lens, makes it ideal for all manner of photographic needs. A particular advantage of this zoom is that photographers have no need to fear a loss of quality in comparison with corresponding primes and must only accept that the initial aperture is not quite as fast.
Its sophisticated optical design comprises 14 elements in four groups. Altogether nine elements are manufactured from glasses with anomalous partial dispersion, and three of these are fluoride lenses with the particularly low dispersion characteristics needed for the correction of chromatic aberrations.
Monochromatic aberrations are effectively minimised by the integration of three aspherical lens surfaces.
These constructional measures ensure that the Vario-Elmar-S 30–90 mm f/3.5–5.6 ASPH. can be used without any reservations throughout the entire zoom range at all focusing distances and at maximum aperture, as stopping down only minimally improves its already extraordinarily high imaging performance. At all focal lengths distortion is extremely well controlled and vignetting effects imperceptible. The Vario-Elmar-S 30–90 mm f/3.5–5.6 ASPH. delivers consistently dependable high performance and offers extreme flexibility and creative potential for a multitude of photographic challenges.
Well that is the Blurb.
What is it like in real life? That's a great question as few people have managed to put this lens through it's paces and had the opportunity to write it up.
Earlier this year we took a trip to Yorkshire and Derbyshire and took a few shots. Because we were concerned about lighting in some situations, we took a three camera rig to allow for all situations. In our view the best available combination. Leica S2P with S30-90, Canon 1DX with new 24-70F2.8 & Sony RX1. A terrific combination. In fact the Leica shoots well when wide open so we needn't have worried unless we needed high ISO shots which was where both the Canon and Sony excelled.
So how did the S2 Perform with the Vario-Elmar-S 30–90 mm f/3.5–5.6 ASPH?
Take a look.
I was shooting at Peveril castle and Yvette snapped me using the S2P with the little Sony.

As you can see we were pretty high up. The overall image I was taking is here. This is looking down into Hope Valley.

If you look right of centre you can see a church. Here is a crop of this section to show the resolved detail. Notice the brown looking shed in the hills with blurs to the left.

Now the shed it clear with it's skylights. The blurs to the left resolve as trucks. People can be seen in the streets and the church's overall size becomes evident. This is far beyond the resolution of any other kit we had with us.
Below are a series of images from the trip. Lovely colour. Minimal processing. Mostly taken wide open on overcast days. Basically what came out of the camera was pretty much spot on for detail and colour. Bear in mind that Leica produce lovely sharp lenses with pleasing contrast. This provides good balance to the images.
 This was a very overcast day but the details are bright and sharp. The water looks wet, The balance is right.


 This Hurricane was on display in York. It was a showery overcast day. Almost no processing was needed with these images.
This one below is from the Hope Valley. Everything was overgrown.


Take a look. The one above is inside Peveril Castle. No light so I under exposed 3 stops wide open and used Photoshop to lift the gain. Shot at ISO 1250 which I never planned to use but I wanted the shot...
The files are amazing. Very sharp and bright and, with the headroom on the S2 there were few situations where the Leica wasn't the camera of choice. [I took a lot of indoor images with the Canon where I needed some video as well.] The 30-90 balances very well on the S2. I found it very easy to use. Walking through people the combination drew a bit of attention but as i was focused on getting images i only had a couple of people wanting to talk gear over the obvious images all around. Shooting wide open at F3.5 was very useable. I just had to remember the depth of field adjustments in medium format over 35mm which i did sometimes miss calculate but otherwise it was easy. These images are very sharp and clear with great contrast and realism.


This one was shot in the Shambles in York. The image was under exposed by 1 stop but came up well.
What can I say except that this is now my favorite lens. And remember I do have the 35mm F2.8 which is very sharp. But this combination of 24-72 equivalent as a 30-90 medium format is a deal breaker. It is everything Leica claim and a lot more. I don't read up on gear much now. I have what is needed to get the shot.
The weight is right. Yes it is well built so you are carrying a bit of weight around but I was always comfortable. Interestingly I was very pleased with battery life. With the large Canon bodies I have got used to several days shooting without thinking about batteries though it's always practical to carry a spare. We made sure that the spare was always ready to go. But not an issue. We were shooting for several hours each day, taking over 6000 images on this trip. It was never necessary to swap a battery out because it was empty. We just charged in the evening and made sure we had charged packs each morning.
Specifications:
Number of lenses/groups: 14 / 11
Focusing range: 0.65 m to ∞
Smallest object field at 30 mm: 514 mm × 771 mm, at 90mm: 194 mm × 291 mm
Largest reproduction ratio: 1 : 6.5
Aperture: Setting/Function Electronically controlled diaphragm, set using setting / selection dial on camera, including half values
Lowest value: 32
Bayonet: Leica S bayonet
Filter mount/Lens hood: External bayonet for lens hood (included), internal thread for E95 filter, filter mount does not rotate
Dimensions and weight: Length to bayonet mount approx. 113.5 / 144.3 mm (without / with lens hood). Largest diameter approx. 101 / 150 mm (without / with lens hood). Weight approx. 1275 / 1345 g
Typical Advertising Comments
The Leica Vario-Elmar-S 30–90 mm f/3.5–5.6 ASPH. combines the versatility of a zoom lens with the imaging performance of equivalent primes. From the angles of view it translates to a 24 to 72 mm zoom in 35 mm format – the versatility offered by this universal range of focal lengths, from an extreme wide-angle to a little longer than a standard lens, makes it ideal for all manner of photographic needs. A particular advantage of this zoom is that photographers have no need to fear a loss of quality in comparison with corresponding primes and must only accept that the initial aperture is not quite as fast.
Its sophisticated optical design comprises 14 elements in four groups. Altogether nine elements are manufactured from glasses with anomalous partial dispersion, and three of these are fluoride lenses with the particularly low dispersion characteristics needed for the correction of chromatic aberrations.
Monochromatic aberrations are effectively minimised by the integration of three aspherical lens surfaces.
These constructional measures ensure that the Vario-Elmar-S 30–90 mm f/3.5–5.6 ASPH. can be used without any reservations throughout the entire zoom range at all focusing distances and at maximum aperture, as stopping down only minimally improves its already extraordinarily high imaging performance. At all focal lengths distortion is extremely well controlled and vignetting effects imperceptible. The Vario-Elmar-S 30–90 mm f/3.5–5.6 ASPH. delivers consistently dependable high performance and offers extreme flexibility and creative potential for a multitude of photographic challenges.
Well that is the Blurb.
What is it like in real life? That's a great question as few people have managed to put this lens through it's paces and had the opportunity to write it up.
Earlier this year we took a trip to Yorkshire and Derbyshire and took a few shots. Because we were concerned about lighting in some situations, we took a three camera rig to allow for all situations. In our view the best available combination. Leica S2P with S30-90, Canon 1DX with new 24-70F2.8 & Sony RX1. A terrific combination. In fact the Leica shoots well when wide open so we needn't have worried unless we needed high ISO shots which was where both the Canon and Sony excelled.
So how did the S2 Perform with the Vario-Elmar-S 30–90 mm f/3.5–5.6 ASPH?
Take a look.
I was shooting at Peveril castle and Yvette snapped me using the S2P with the little Sony.

As you can see we were pretty high up. The overall image I was taking is here. This is looking down into Hope Valley.

If you look right of centre you can see a church. Here is a crop of this section to show the resolved detail. Notice the brown looking shed in the hills with blurs to the left.

Now the shed it clear with it's skylights. The blurs to the left resolve as trucks. People can be seen in the streets and the church's overall size becomes evident. This is far beyond the resolution of any other kit we had with us.
Below are a series of images from the trip. Lovely colour. Minimal processing. Mostly taken wide open on overcast days. Basically what came out of the camera was pretty much spot on for detail and colour. Bear in mind that Leica produce lovely sharp lenses with pleasing contrast. This provides good balance to the images.


This one below is from the Hope Valley. Everything was overgrown.

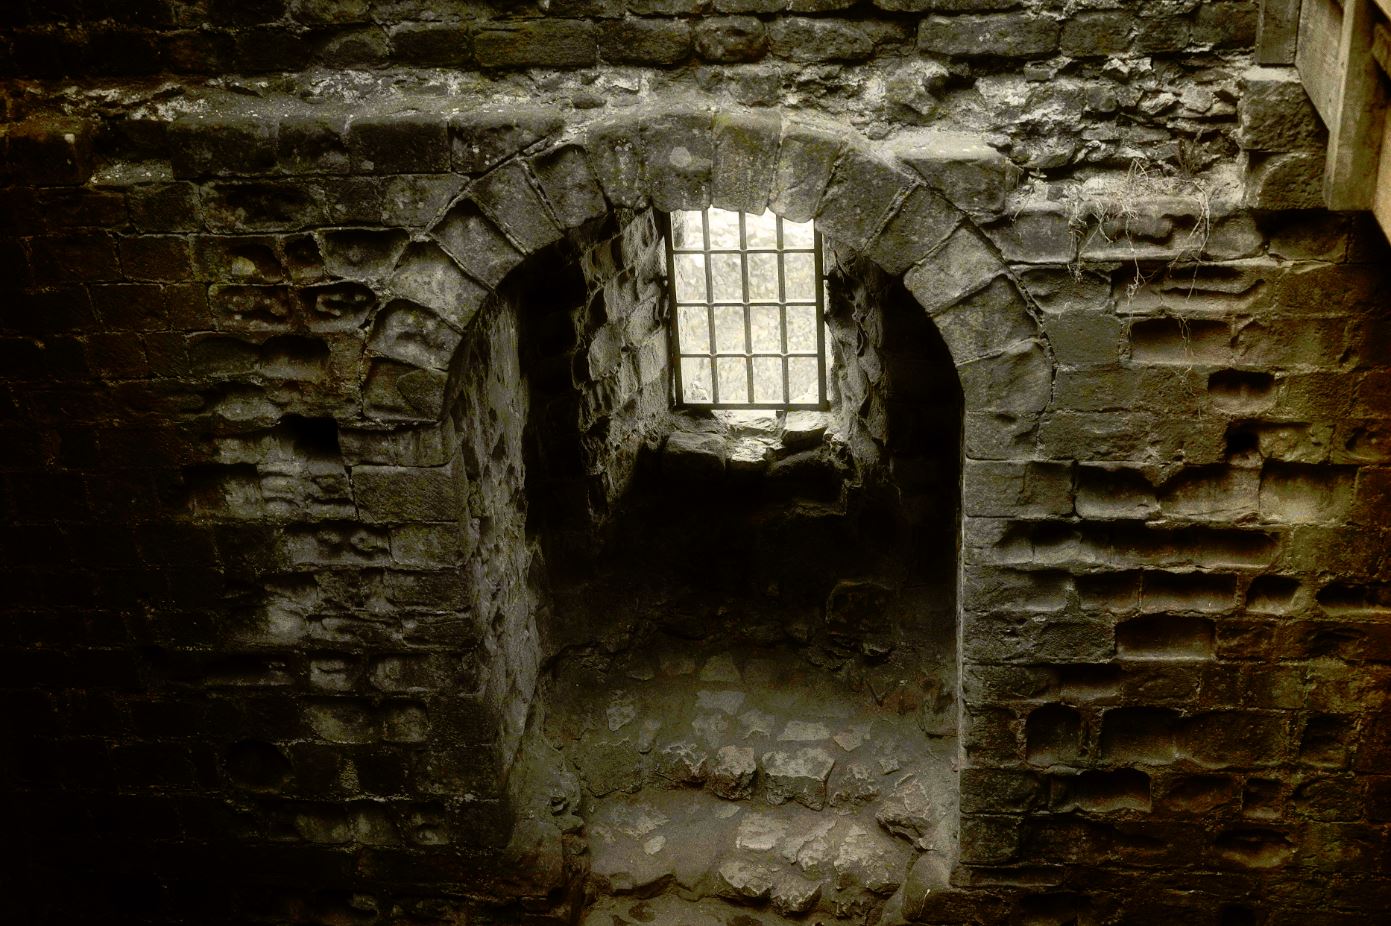
Take a look. The one above is inside Peveril Castle. No light so I under exposed 3 stops wide open and used Photoshop to lift the gain. Shot at ISO 1250 which I never planned to use but I wanted the shot...
The files are amazing. Very sharp and bright and, with the headroom on the S2 there were few situations where the Leica wasn't the camera of choice. [I took a lot of indoor images with the Canon where I needed some video as well.] The 30-90 balances very well on the S2. I found it very easy to use. Walking through people the combination drew a bit of attention but as i was focused on getting images i only had a couple of people wanting to talk gear over the obvious images all around. Shooting wide open at F3.5 was very useable. I just had to remember the depth of field adjustments in medium format over 35mm which i did sometimes miss calculate but otherwise it was easy. These images are very sharp and clear with great contrast and realism.


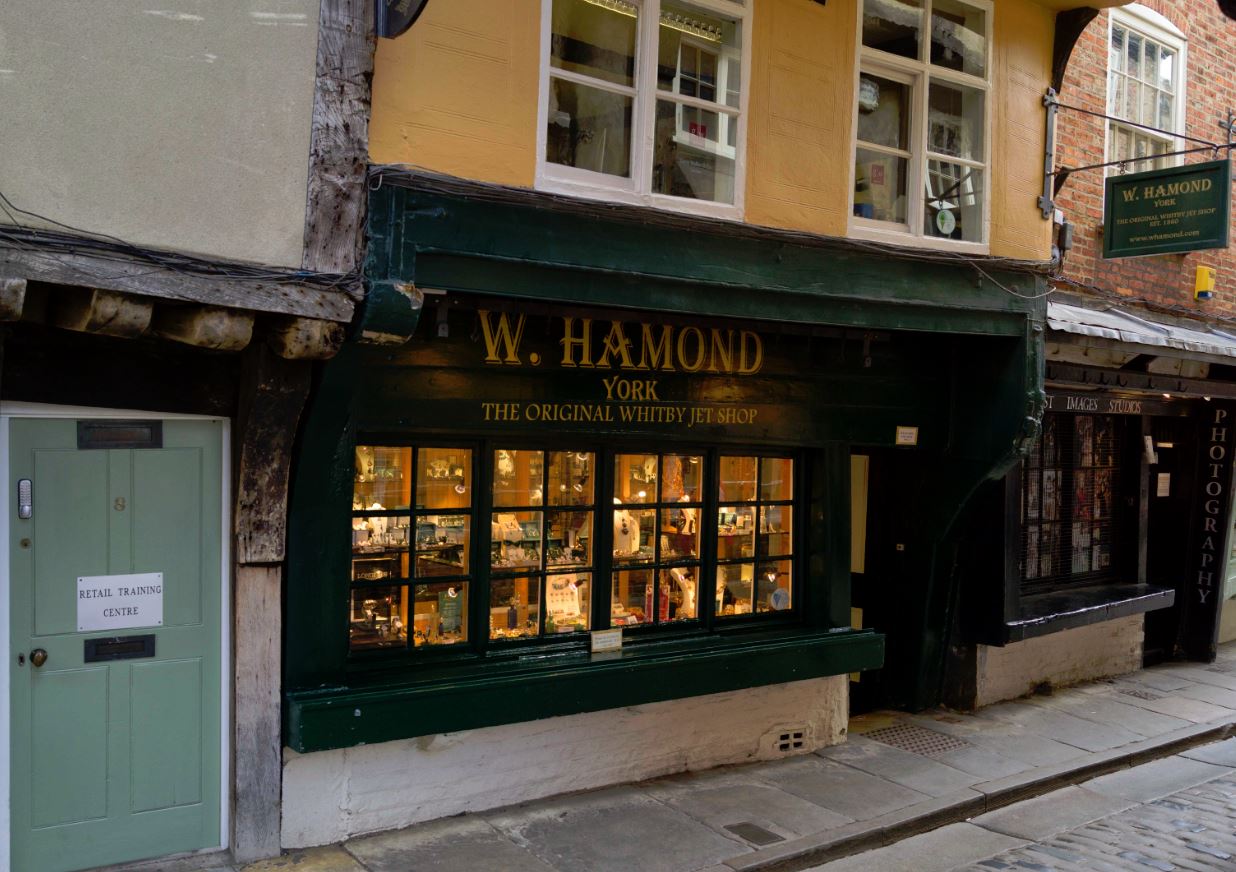
This one was shot in the Shambles in York. The image was under exposed by 1 stop but came up well.
What can I say except that this is now my favorite lens. And remember I do have the 35mm F2.8 which is very sharp. But this combination of 24-72 equivalent as a 30-90 medium format is a deal breaker. It is everything Leica claim and a lot more. I don't read up on gear much now. I have what is needed to get the shot.
The weight is right. Yes it is well built so you are carrying a bit of weight around but I was always comfortable. Interestingly I was very pleased with battery life. With the large Canon bodies I have got used to several days shooting without thinking about batteries though it's always practical to carry a spare. We made sure that the spare was always ready to go. But not an issue. We were shooting for several hours each day, taking over 6000 images on this trip. It was never necessary to swap a battery out because it was empty. We just charged in the evening and made sure we had charged packs each morning.
It probably sounds unusual to be talking about using a Leica S2 camera system on what was clearly a holiday trip to the United Kingdom. But knowing that we would be visiting Yorkshire and Derbyshire and remembering the picturesque locations it was hardly likely that we would be taking anything less than some first-class camera equipment. It is also good to think about how the system performs when you're constantly moving around walking the streets looking for images. Given the size of the camera it might be anticipated that it would draw a certain amount of attention. Especially with the new 30 to 90 mm lens on the front. It is imposing. But, I am pleased to report that, even without putting any tape over the name, we were able to use the camera all the time. And what's more, the beautiful soft light that we were photographing looked absolutely awesome when we looked to the images that we had collected at the end of each day. Never once did we return home to the beautiful barn conversion that we were staying in, just north of Sheffield, disappointed because the images did not live up to our expectations. The camera captured the light beautifully allowing the photographer to focus on getting the image. Framing the image has become that much easier with a 30 to 90 mm lens. Because this was a family trip we tended to have very little time to just walk around just taking photographs. We did manage to find a couple of days. Because most of the time when we work in Australia we are used to photographing in harsh West Australian light or slightly softer Victorian light. The softness of the light around Yorkshire and Derbyshire combined with the greenness of the valleys and the contrasting appearance of the stone buildings makes the whole idea a photographers dream.
The weight of the camera was a consideration. Carrying it around all day is always a concern for any photographer. I guess it depends what you are used to. If you are used to carrying a pro body around with a good quality lens then this is not something that you would be concerned about. It is very easy to carry around. In the hand, the body is molded beautifully for the right-hand. Everything just seems to be proportioned perfectly. I would not hesitate to say that this is a camera that you can hold rock solid. He does not feel plasticky or cheap anywhere. I was switching between the Leica and the Canon 1DX camera fitted with the mark two 24 to 70 mm lens. The Canon is bigger and of a similar weight in this combination though the Leica is more front heavy with the larger lens. The Canon provides the opportunity to shoot in much darker situations and of course it gives you the opportunity to take some video film. I count myself fortunate to have had the opportunity to use both on this trip and to be able to choose which of the two I'm going to use in professional work regularly.
Image quality.
One word suffices: Awesome. There is a reality in the images that are taken with a Leica camera that it's difficult to explain. I've heard it called the Leica look. I call it realism. It's as if there is nothing between you and the image. It's that last 10% that defines real quality over and above what you expect.
I still recall with some shock the very first images that I took with the Leica. Being used to image quality from standard SLR cameras [Pro cameras with L-series lenses] I took some photographs of some winter bushes complete with bright red berries. The colors were exceptionally bright, and when I took the photographs, I knew from past experience that there was little possibility of capturing the freshness and brightness of the scene. However I had never taken photographs with a Leica before and this gave me my biggest surprise. When the photographs were on the screen I was shocked and very pleasantly surprised. All of the freshness and sharpness of the image was there before me. I magnified the image up to 100% and saw detail in a way that I had never experienced with any photographic instrument. Leica users who use the cameras regularly will probably be reading this and know exactly what I'm talking about. It's just something that goes with Leica territory. However when you combine all of this with the creative potential of a medium format system you just simply step into a different area of photography altogether. Simply marvelous. Now this is not to say that other camera systems don't capture images beautifully. But there is something hard to define about the optical brilliance of the Leica system.
Using a Leica does put a certain amount of pressure on your computer when it comes time to processing the images. The image files are huge: opening into files approximately 100 MB in size. We have a computer that has a scratch drive that provides 128 GB of supporting memory behind 16 GB of RAM. Even this behemoth of a computer can struggle if I try to open too many files. Photoshop does a very good job of handling the files as does the phase 1 camera system. However, I may be in the minority but I find the automated genius of the Silky Pix Pro system to be ideal. We have saved a series of presets within the system that we use with Canon cameras, Pentax cameras & Sony cameras as well as Leica of course. Built into the Silky Pix system are some excellent tools for sharpening and handling noise. The way that Silky Pix handles noise is well worth taking a look at. It's also very good at finding and using headroom in images and has a natural HDR function. It's an intuitive program for use with professional cameras.
Where does the Leica S2 system excel?
What you see is really what you get. But that is the reality that you have to get used to when using the Leica system. It's almost like the difference between 2-D and 3-D images. There has been a lot written over the years about the amount of time that is spent in a so-called digital darkroom working with the computer. Photographers want to be out taking photographs whereas they have to spend considerable hours sitting in a room in front of a computer examining images on a monitor. If the wedding requires 1000 images and a photographer spends just three minutes on each of those images processing them and fixing up defects that equates to 3000 minutes. This equates to 50 working hours. So if you can take photographs and you are that much closer to what you want in camera so to speak, then logically it's going to save you a lot of time. Why would anyone want to spend 50 hours sitting in front of a computer? So getting it right "in camera" has got to be a priority with a photographer. He wants to be able to process, using the analogy above, 8 to 900 of the images automatically. Sure there might be a little bit of cropping but that's it. He wants to save his creative genius for the 100 major images that he takes on the day. Thus he can reduce his working time from 50 hours to perhaps 16, in other words two days. Surely that makes sense. And that is what the Leica S2 P gives the photographer. Combined with the 30 to 90 mm lens for outstanding versatility he is that much closer to the finished product and can focus on framing and getting the image right when it's taken. And of course because he's using medium format he has a wonderful flexibility in terms of depth of field that will result in some remarkably creative images if he puts his mind to it.
But word on the sensor.
CCD sensors are different to CMOS sensors. There is no doubt that CMOS sensors are ideal for developing cameras that can handle high ISO settings and obviously very low light conditions. CCD sensors however handle color beautifully. There is a solid feel about the colors taken with this style of sensor. You will have limited versatility in terms of the ability to go up to really high ISO settings. I have found the Leica S2 P sensor to work very well up to 640 ISO. In fact, I used that setting a lot while I was in the UK and came away with some stunning photographs. I even went up 1200 iso with no difficulty. True there is usually a little intrusive noise if you don't know how to handle it but as I mentioned before the Silky Pix Pro program is ideal for this. But that's the limit. With the Canon 1DX I will happily go up to 6400 ISO and know that I can use the image. I still have to use some noise control. But noise is all a part of the digital photography world and I don't see the sense in trading off the image quality of a CCD sensor simply to avoid having to deal with a little noise in the post processing stage. The benefit in using the CCD system in a medium format system is that you get a wonderful definition of color and detail.
It has the ability to capture the wonderful detail of the Leica lenses. For me the system is about as perfect as you can get. It's not for sports photography where the speed of a Canon 1DX is perfect but for almost every other type of photography I have no problem in using a Leica medium format system.
Highly recommended.
Lens Details
Number of lenses/groups: 14 / 11
Focusing range: 0.65 m to ∞
Smallest object field at 30 mm: 514 mm × 771 mm, at 90mm: 194 mm × 291 mm
Largest reproduction ratio: 1 : 6.5
Aperture: Setting/Function Electronically controlled diaphragm, set using setting / selection dial on camera, including half values
Lowest value: 32
Bayonet: Leica S bayonet
Filter mount/Lens hood: External bayonet for lens hood (included), internal thread for E95 filter, filter mount does not rotate
Dimensions and weight: Length to bayonet mount approx. 113.5 / 144.3 mm (without / with lens hood). Largest diameter approx. 101 / 150 mm (without / with lens hood). Weight approx. 1275 / 1345 g
Thursday 21 February 2013
Leica S2 User Review UPDATED December 2013
Leica S2
Setting The Standard in Portable Medium Format

There have been a number of Leica S2 reviews. I read lots of them and got plenty of good information from them. Some are very technical. Personally I tend to skip the really long paragraphs. Some of the investigations into pixel level imaging seem a little pedantic.
At the end of the day image quality and how quickly you can get there are more important. In most cases the reviews were based on having and using an S2 for a week or two. A professional photographer can assess the usefulness of this type of tool very easily in that time. Probably the best one was written by Steve Huff. If you haven't seen his blogs then take a look; they are well worth reading. He is enthusiastic about Leica, and why not? They are dedicated to engineering excellence in imaging and I believe that they are on the right track.
For reference you might want some background about me.

My go-to range of cameras have usually been Canon (I switched from Nikon due to the degree of colour correction required) and I have three Canon pro bodies that I use regularly including the 1DX which is amazing. (I also use a 1D Mk 4 and a 1DS mark 2 which I kept in preference against the mark 3 which I traded: but that's another story.) The other main camera that I use is a Pentax 645D with a raft of lenses including a number of Pentax classics as well as the new 55mm and 25mm from Pentax. So for reference my experience and cameras used are at the working level.

So why look at the S2? For me it began with an M9 which I used for over 12 months. I was intrigued by the 'hype' about Leica. Could it be that good? It seems to attract a lot of comment. Some cannot see what the fuss is about whereas others just sing the praises of the lenses and the body design. So I decided on an M9 as a small walk-about camera.
When I took shots with the M9 using a Summicron 50mm lens and later a Summicron wide angle I saw qualities in the images that blew me away. With over 20 years taking photos I had not seen this image quality except on very few occasions previously. I was taking nature shots and the colour and clarity was superb. I also loved the fact that you could get such outstanding quality in images from something that looks so old fashioned and hence attract little attention.

More important though is the image quality. It is without parallel in the 35mm world. There was only one niggle and that was the question of focusing quickly with a viewfinder that's ok but not big and bright. I mastered it to the point that I was able to focus on moving helicopters and get a lot more hits than misses.
Then came the wedding....
A friend of mine was getting married and had arranged for a family friend to do the photos. I wandered along with the M9 ( I would normally have taken a Canon body) and took some shots in this real life setting but having in mind a possible pro application. Having done a number of weddings before the composition was second nature. But using an M9 in that situation is very difficult. I took about 100 shots of which over 50 were in the very good class but I had to work very hard to get the focus right. Thinking from a commercial point of view I realised that the M9 was not the tool to take into a wedding. It's good and you will get a lot of winners but there are moments when you don't want to be worrying about focus. You just need the image.I know! I Know! There are photographers who use the M9 at weddings. But with so much to think about at the wedding you really want to focus on composition. At least I do.
The question became: how to retain Leica image quality and get auto focus. The only step in existence was the S2. But was it worth it?
 The only thing to do was try out the S2. I already had the 645D but its size and at times, hunting focus, don't make it ideal for commercial work as an all rounder. From a pro photographer point of view I see all round usability as a key. I took an S2 bush and did a direct comparison of 4 systems. The same shots were taken with 4 cameras.
- M9 with Noctilux
- Canon 1DS mark 3 with 50mm 1.2
- Pentax 645D with 55mm F2
- Leica S2 with 70mm Summarit

Then image quality was compared. Straight from the camera as well as fully post processed.
Image quality results were very different. More than you might imagine.
The tests covered a range of lighting conditions. The Canon came back a way in image quality and colour accuracy. It was very good of course but at this level we are looking closely at every area of image comparison. Not splitting hairs because the differences were obvious but still looking at things from a higher level or expectation. Then came the M9. The M9 clarity being amazing but the colour as always slightly off. As expected the 645D was outstanding. The 645D is an amazing camera. In almost every respect it takes cleaner and better images than the Canon or the M9. The 645D is a camera that allows you to take files in both raw and Jpeg with good results but I will leave that debate to another post.If only it was a little faster to find focus.
But the S2 is in a class of its own. The files were even cleaner and smoother than the 645D files and had the almost 3D quality that Leica lenses produce. They are much better than scaled up M9 files. They have a quality that just has to be seen. What is it about them? It's hard to define. But it is recognisable. So my decision was made there and then. The Canon body went along with a couple of lenses and the S2P became my portable medium format camera.
With the easiest no frills menu system built into any camera, I was using the camera competantly on the first day. This is classic Leica thinking! Very good!
I have read a lot of comments about Leica lenses. Many of the positives come from users and many of the negatives come from people who have never tried them or just given them a quick look. Seriously, do yourselves a favour. Try them seriously. You will be shocked if you really give them a go.
Is that it then? No. A working pro needs a range of equipment and Canon do make fine 35mm based systems. The 1DX referred to earlier joined the stable. The 1DX is for speed and naturally because there are a lot of situations where frankly 18 megapixels is plenty. The 1DX has cleaner files than any previous canon camera but that's another post. I have a feeling that the 1DX would have done very well in the photo trial mentioned earlier. In a few weeks it will have its chance. This time it will just be three camera shoot out. The M9 has gone. The S2P is so light and easy to use that I reach for it all the time. In fact I am planning a trip overseas and without thinking I selected the 1DX and the S2P with a couple of lenses apiece as my travel kit.
For updates on that trip see the blog entry on the 30-90 Vario Elmar lens. I picked it up a day before I was due to fly to the UK and took it as the Leica lens. It has great contrast and clarity and a true Leica look to the images.
I did a magazine shoot a month ago and I used the 1DX and the 645D as well as the S2P. Then after processing I put the shots up on the cc screen and let them play through. All of the images selected by others as being of the very highest quality were taken with the S2 yet none of the selectors had any idea which camera had been used for what. There were lots of comments on the whole set of images taken. Time and again the Leica images were said to be 'real.' Again, a Leica user will understand what this means. Looking through the shoot we took over 400 images. They were all composed well and evenly lit. But that extra oomph came from the S2 files. It's always reassuring when you get lots of unsolicited comments.

So was the investment wise? I have to say at was well worth it. I now use it with both a 70mm and the 35mm lens. They give Noctilux like smooth quality images that are sharp and even at all apertures. The 35 mm is the sharpest lens I have ever used. Think Summicron 50mm and you are in the ball park.The 70mm isn't far behind.

There is no such thing as a perfect camera. But the S2P is as close as I have used.
So the S2 has pros and a few cons.
Pros
Image quality is amazing
Ultraportable
Excellent battery life
Accurate focus
Access to Leica lenses of superb optical performance
Reliable images that require very little adjustments out of camera
Very easy menu system
The shortest learning curve of any camera on the market in the pro field. It has almost no bells and whistles: it just works.
Huge dynamic range to the images.
Very good metering.
Amazing back review screen
Cons
Limited ISO performance. Good to ISO 640 but a bit noisy after that point. I use Topaz noise reduction - Slow but retains bucket loads of detail so not really an issue.
Limited ISO selectivity.
Top information screen invisible in daylight.This really needs to be improved but not really an issue to a working pro.
Viewfinder info hard to see in bright conditions though the field of view is spot on.
I am still amazed at the image quality this camera can produce. Colours are superb and image quality straight from the camera is excellent. This is a good job as you need a lot of computer power if you are working these images. Every raw processing program I use from Photoshop to silky pix pro and beyond has to work hard with this file size. The files daunt even my huge Mac Pro tower and that has a scratch drive to call on!

Leica S2
For the technical
Sensor
Kodak-made 16-bit 30x45mm CCD chip with 37.5-megapixel effective resolution.
Kodak-made 16-bit 30x45mm CCD chip with 37.5-megapixel effective resolution.
Lens I Use
35mm & 70mm f/2.5 Standard Lenses
35mm & 70mm f/2.5 Standard Lenses
Memory
No built-in memory. Takes CF and SD (up to SDXC) memory cards
No built-in memory. Takes CF and SD (up to SDXC) memory cards
Viewfinder
Direct TTL-type with 96 per cent coverage and 0.86x magnification. Built-indiopter adjustment
Direct TTL-type with 96 per cent coverage and 0.86x magnification. Built-indiopter adjustment
LCD Screen
3-inch TFT LCD screen with 460,000 pixels
3-inch TFT LCD screen with 460,000 pixels
ISO range
ISO160–1250 (expandable to ISO80–1250)
ISO160–1250 (expandable to ISO80–1250)
Focus modes
Single and continuous
Single and continuous
Max burst rate
1.5fps
1.5fps
Shutter speeds
8–1/4000sec timed speeds, with flash sync at 1/125sec or up to 1/500sec withcentral-shutter lenses
8–1/4000sec timed speeds, with flash sync at 1/125sec or up to 1/500sec withcentral-shutter lenses
Weight
1.4kg body only
1.4kg body only
Dimensions
160x120x81mm
160x120x81mm
Power supply
7.4V, 2150mAh lithium ion battery
7.4V, 2150mAh lithium ion battery
Thursday 17 January 2013
Monday 14 January 2013
Love your tripod

Love your tripod
One of the finest tools that you can have is a tripod. It makes certain aspects of photography a breeze. In fact without a tripod certain shots would be virtually impossible. Photographing flowers with superb depth of field for example often requires long exposures. For example I recently shot some Lillie's at F32 for 8 seconds with a macro 100mm lens. A tripod was vital.
Some people think that with the advent of digital photography the tripod is dead. They point to impressive high ISO settings as the answer. But the higher the ISO setting used the lesser the quality of the image becomes. There is no way around this. High ISO settings can get you the shot in some situations but a tripod will often accomplish much more and allow you to achieve a higher quality with sometimes greater creativity. In fact using digital cameras and a tripod you can do more than you dreamed of.
Some point to the anti vibration settings in lenses. these are great. My standard walk around lens has anti vibration technology built in. This is great but still has significant limitations. Tripods can let you do much much more. For example perspective alters greatly depending on the height of the camera. If you take all your shots at head height you miss a lot. Sure, at full height we are stable and bending down may make us unstable but there are lots of photo's that look very good from a lower position. A tripod is the key. It gives you a full range of shooting positions.
Are you convinced? So what do you look for?
Look at how well it is made. I use three tripods in the field. Each are light weight but very stable.
So ask the questions.
Is this stable?
How well do the leg mechanisms work? Do they lock easily and have no play?
Is this sturdy? Is it still light enough to carry?
Does the size suit what you are doing when both open or closed?
Is the tripod one that you can carry around all day if that is it's use?
Stability is a given??? Right? Not always. Some tripods have a lot of play. There is no point in having a tripod that you don't use because you can't trust it or it is too difficult to use. If the salesman won't let you check it over then go somewhere else. It's your money and a poor choice could cost you twice if it causes you to miss a great image.
Some of the very light tripods are not so well made. When they get loose there is no way to tighten them up. A good ball head will often have a point at which to tighten the head as it wears in. Worth checking. Two of mine incorporate spirit levels and I use them all the time.On uneven ground the levels are very useful. The concern with some heads is that they add a lot of weight. They feel strong and are smooth but the extra weight can be a drawback to successful photography. Look at the weight carefully. In a studio setting I use a heavy ball head tripod that is really superb but its far too heavy to use in the field.
Leg mechanisms are very interesting. Some twist and lock whereas others have plastic locks. Some loosen easily whereas others can lock up and become hard to use. Careful choices are needed. Cheap plastic locks break easily. I use three tripods in the field. From a mini which is very light to a medium and a large. None of them have cheap locks on the legs. [I was given a very light weight tripod which has cheap locks and it never travels with me. I do actually use it but never on site. I wouldn't trust it.]
So take your time and get a good one. They will last you a long time and often save the shot!
Basic Work Flow For Photographers

Today with cards holding 1000's of images we cannot afford that amount of time. But we still want good results. [1000 x 2 minutes = 2000 minutes or over 33 hours.]
Establishing a consistent workflow is an essential part of digital photography. Having a workflow will help ensure that you handle your images the same way each time. Consistency is important as it establishes your style but also makes your files easier to locate. Give particular attention to naming and metadata. A proper workflow will help you move, rename, and archive your photographs and should substantially reduce the risk of losing that important shot. When you know that you have the image and cannot locate it it can become very frustrating. If you have a large data file it may take you hours unless your images are named and filed correctly.
As a basic workflow suggestion here is something very basic. It is worth writing out your workflow and pasting it in an area alongside your computer. It may help to keep you on track. At the very least, there is always a certain discipline that needs to be adopted as part of supporting your photographic technique. So here is something basic.

1. Use a card reader (not your camera, it's much too slow) and transfer your images to your computer. Having a reasonably fast computer is always good at this point. I will often load my images to transfer into two separate hard drives and then go away and do something else for five minutes. When you return the files have been transferred and are ready for examination.
2. Be ruthless. Examine your photos and discard those that don't make the cut. You will probably lose a third of your images. Are they in focus? Are they well composed? Do they make sense? You cannot be emotional when looking through your photographs. In many instances you may find that you have taken two or three that are essentially the same. Choose the one that really works. The system that has been adopted where images are given some sort of rating is superb. Rating your images with a simple scoring system of one through to 5 is simple but very effective.
3. Using your editing program re name the images and add key words. This is best done as a batch. The more data you can add the better. Make sure that you amend the meta data to show that you are the author. Your camera has already recorded information such as camera settings. Most cameras can be programmed to write the authors name, dates and file. It saves time. It's good to add some sort of brief description so that your computers search programs can find the images quickly.
4. Now you are ready for processing. Don't be too concerned about the thousands of tools that have been built into the editing program. For photography you will rarely use use many of these tools. A basic processing sequence will work fine. Essentially, it comes down to white balance so that you get natural colours. Then it's a matter of looking at the vibrancy and dominant colours in the image. Make sure that the image pops so to speak. Then you need to look at the crop to determine anything that needs discarding. There are often very good photographs sitting inside bad composition. By cropping out that which does not make sense you may find that you have a winner. Then it is simply a matter of sharpening and addressing any noise issues that may affect the final image. Remember the sequence. White balance, colours, crop, sharpen, noise.
I have purposely omitted healing tools from this basic sequence. If you are selling images you will need to go through and remove any spots using the healing tool. This adds minutes to each image so it is best kept for just those images that will be supplied.
5. When you are satisfied that these are addressed then save as your preferred file.
You will probably have your own favorite settings for colours based on the camera that you use. Everyone is different. But never forget to correct white balance as step one and save sharpen/noise to the end.
Just simple tips but once you are consistent you will get faster and enjoy your photography more! There are complicated discussions regarding workflow for photographers but please remember that photography is being about with your camera taking photographs. It is not about sitting in front of a computer doing endless editing. This all takes time and unless you are being paid considerably for this time you need to work quickly. Enjoy!
Saturday 12 January 2013
Interpreting camera reviews.

 |
| 35mm Film ISO 100 Canon 1N |
The same photographer, after they have used the camera for a period of time is going to have a different view. It will likely be very positive but at the same time they will have discovered its limitations. Every photographer has to work around the limitations of the equipment that they have. Of course if the camera has strengths that are the same as the photographers, then it can be heavenly to use. That is just the way that it is. So then with regard to this type of review it is important to recognize that there is not always complete objectivity in the way that the report or review is written.
The second limitation in reviews is that the reviewer's experience is based upon other cameras that they have used. If they are coming from a background of using a basic camera and they go to an enthusiast SLR and they get good results then it is not surprising that they will rave about the camera. For them it will be a big step up. If however they have been using a top-of-the-line medium format SLR pro camera then their experience is a step down in some ways and this will reflected to some degree in their comments. It is always helpful to know on what the comparison is based.
 |
| 6 megapixel Image |
It is also helpful when they include references to where the camera fits into the overall scheme of things photographic.Some reference or comparison point is essential.
As a final observation on camera reviews it is important to recognize that photographs are taken by people using the camera as a tool. 35mm film has been effectively compared to an eight megapixel camera.
There is merit in this simple viewpoint. Many mobile phones have eight megapixel cameras these days. However using 35mm film some of the most remarkable and influential images of all time have been taken. They were put together by thinking photographers. They knew what to capture and how to do it and they worked within the incredible limitations of film. No auto ISO settings in those days. The ability to see the photograph, to compose an image focusing on what is really important is the key.

Buying a good camera is a good idea. It will not make you a photographer but it will give you the tools to start with. A friend of mine observed that it takes about 10,000 hours of photography work to become a good photographer. I'm not sure that that's actually right but it's probably in the right region. Photography is as much about thought and composition as it is about firing the shutter. As you read this notation you are surrounded by wonderful photographs. Can you see them? If you can then pick up your camera and get shooting.
Wednesday 9 January 2013
Introduction This Blog Is About Getting The Shot
Well for years we've been asked whether or not we will put up a proper functioning blog. So we thought we'd start with this Google blog and through it we'd inform you about various things that we do as well as giving you a bit of information about some of the equipment that we use and taking the time to comment on some of the issues that go around in the photography world.
Perhaps like me you have read some of the raving reviews about various cameras and photographic equipment, often written by people who have just got the camera and are in what we would call the "honeymoon period" when the camera can do no wrong. The fact is that modern cameras are very impressive and when you combine that with very good lenses you get some good results.
However it's only when you've had the camera for little while that you begin to realize that it has limitations. You walk into a situation and you're pretty much convinced that you'll get a shot only to find when you get back to the studio or digital dark room that the image that you took didn't work out quite as you thought it would. It's frustrating especially when you consider that certain moments just occur as one-offs and there is nothing you can do to recreate the shot.
Many of my friends have obtained digital SLR cameras and when they go out to take photographs and look at the screen on the rear of the camera they are absolutely convinced that they've got good photographs because they base their decision solely on the rear view. Sometimes they're right. But as any working photographer will tell you, what appears on that small screen on the back of a camera can look very different when you have it on the big screen. And when you go to make the print then contrast and detail can be missing.
This then is a real world Blog. It's about the challenges of getting the shot. Over the years we have picked up a few tips and I intend to include a number of these in various posts. Often when taking the shot the key ingredient is to know your equipment. We use Leica, Pentax & Canon cameras and lenses. With Leica and Pentax we shoot medium format and Canon we choose for reliable 35mm format. We use primes and zooms. We use both CCD and CMOS sensors. They all have a place. But regardless of the camera used the starting point is vital: when the image is there to take you must be ready to take it. No matter how great the shot was - when its gone then no matter what camera you were carrying you cannot get the moment again.
As an example of the sort of photograph that you just have to get right on the day I have put down below a photograph taken looking across the bay in Albany in Western Australia. It's an early morning shot with storm clouds overhead, mist over the small islands that dot the bay, and the sun is breaking through. The scene will exist for approximately 30-45 seconds. You are driving around the head land and you see the parking bay; you spend 15-30 seconds pulling in and getting out of your car quickly. You now have to take your camera in your hand, decide ISO, aperture and exposure, frame the shot and take it.
If you know your equipment well enough to take it then the shot is there.

Subscribe to:
Posts (Atom)